Tuesday 13 July 2010

Finally.... The E-Wallpaper!

Good Day!

Finally, I managed to finish my E-Wallpaper for the FOM Open Day 2011. Seems that it run a little bit from what I've sketch before. But I think that it's far more better since the viewers want to see what courses that FOM is offering, who to be contact and testimony from other people. This is my E-Wallpaper.


1. Let's begin! 1st, we have done all the editing earlier and it's a plug and play time. Open all of the edited pictures and drag one by one into the background picture that was in A4 size. The picture with letter O need some modification. To make it more realistic like a photo, click layer that contains picture letter O and then go down below and you may find a layer style icon. It's a curvy Fx small icon.

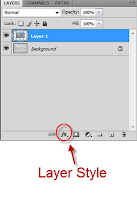
Mark Drop Shadow and set your Distance, Spread and Size as you wish. Once finished, click OK. Now the picture is more realistic, like a photo on a piece of paper, with some lighting from leftside.


2. Then, I arranged the picture and typed some words until the e-wallpaper looks neat and almost done. For the sentence, " What are you waiting for...", I use stroke. Type a word in white colour and then click Stroke at Layer Style. I chose black colour and set the size to 10px. Now it looks like an outline font.


3. I make my last check and a little bit touch up and I'm DONE! The E-Wallpaper is ready to be submitted!

Regards,
Aizuddin Sudari

Pictures : Polaroid...Just a simple one.

Good Day!

I like the polaroid photos very much. It's like a framed photo and have a little space for caption below the photo. To make it in Photoshop was simple. But it's a simple polaroid photo, not a professional with accurate size. It's just for you to play around whenever you are designing any posters or editing photos before you publish it on Facebook elsewhere.


1. I have a photo, in this case, I'm editing the letter F and going to make it into polaroid. So, firstly as you may see, the picture is not attractable enough. So clear out the white background first with Magic Eraser tool.


2. Then find for Gradient Tool and choose your favourite colour, in this case, I chose the rainbow colour and make sure you create a new layer and drag the new layer to be below the picture layer. It is to make the rainbow colour to be the background of the picture. The lower the hierarchy of the layer in the Layers, the more back the thing's placed. Then save the new picture as FFFF.png


3. Create a new file for the polaroid frame. Go to File > New > Width : 384 pixels > Height : 447 pixels > Background colour : Transparent > OK. As the new file/worksheet created, paint the background in white. Then click Rectangular Marquee Tool at Marquee Tool and cut a square shape. Left the square shape in transparent. It's a polaroid frame now!


4. Create a new layer in Layers and drag it to be behind the polaroid frame and open FFFF.png and drag the picture into the new layer created at the polaroid frame worksheet/file. Adjust the size to fit the frame with Ctrl + T and after finish hit Enter. Add some text as earlier photo for caption. Done!

Regards,
Aizuddin Sudari

Tuesday 6 July 2010

Background : Playing with Feather & Opacity...

Good Day!

1. The e-wallpaper requirements is the wallpaper is in A4 size. So I must create an A4 size wallpaper. To get an A4 size, you don't need to use your ruler to measure the exact A4 size paper then key in the measurements and then only you get your A4 size background for your work. Simply click File > New > Preset > International Paper > Size > A4 > Ok.

2. Now, feather is where you want to take a shape of picture then you want to make from a sharp picture to blurry picture from centre to outer picture. I've the FOM picture, now I want to use feather to make the bacground more attractive.

3. Get a picture, the find Marquee Tool at the toolbar. Click a little longer and a popop will pop out asking which shape do you want. I choose Elliptical Marquee Tool.

4. Drag the Marquee Tool to make a shape. Don't drag too much as it will spread out automatically if using Feather. We don't want the shape to spread to the boundary of the picture as it will soon just like the original picture.

5. At the horizontal toolbar, you may find a Feather blank box stating how many pixels you want. I change it to 45 px and hit Enter.


6. Click Move Tool, and click at the picture, try to drag left right up down, you may see that the picture have been cut smoothly and it's getting blurry at the end of the picture.

7. Drag it to a new pages to make a new background.

8. Opacity is to make the picture transparent by certain percentage. Use it to make it dissolve into the white background so when your words written will be more clearer.


Regards,
Aizuddin Sudari

MMU Logo: Clearing the background colour...

Good Day!

1. We may find many MMU Logo at the Google website. I'm using the MMU Logo which my friend gave me before. It's in grey colour. So to clear out the grey colour and to make it transparent at background, follow my steps. Simple and much easier for lazy people like me! Haha...


2. Ok, this is the basic. Now imagine you have a MMU logo with colour at the background. You don't want the colour.


3. Go to the toolbar and look for the Eraser icon. Click at the icon and hold a little bit longer so it will come out a popup like in the picture above. Choose Magic Eraser Tool. It's a magic eraser! Hahaha!


4. Then click at anywhere of the background colour , in this matter, I want to clear out the grey colour, so I click at the grey colour background. Magic Eraser Tool will automatically differentiate colours and only erase the grey colour of the background.

5. Save your file as .PNG and choose None instead of Interlace when a popup come out suddenly while saving. Saving as .PNG enables you to keep the transparent background. If you're saving using .JPEG/.JPG format, the background will change to white.

6. That's all.

Regards,
Aizuddin Sudari

A Sketch of The E-Wallpaper...


Good Day!

1. I've placed here my sketch on what is playing in my head now for the FOM Open Day E-Wallpaper project for Digital Media 1.

2. It's just a rough sketch which I will be playing with polaroid pictures and the grande FOM building as the background of my e-wallpaper.

3. I called it a Malaysia Dreams...(of a management students) that focusing on the management student him/herself, what is their dreams, how must they plan their dreams, and their achievement in order to move one step further to achieve their plans of their dreams.

4. I'll update you with more on how to make a polaroid pictures and playing with shadows later.


Regards,
Aizuddin Sudari

Monday 28 June 2010

An Introduction

About me

It's me!


Basic info


Name: Ahmad Aizuddin Sudari

Gender: Male

Birthday: 05 May 1987

Relationship Status: Single

Current location: Seri Kembangan

Hometown: Bayan Lepas

Political Views: Independent

Religious views: Muslim - Sunni

Favourite Quotations:

"It is no use saying, 'We are doing our best.' You have got to succeed in doing what is necessary.” -Winston Churchill


Work and education


University:

Multimedia University '11

Bachelor of Economics (Honours) Analytical Economics


Secondary school:

SM Sultan Abdul Halim '04


Primary school:

Sekolah Rendah Kebangsaan Bukit Gelugor '99


Likes and interests


Music: Classical, The Beatles, The Fauxharmonic Orchestra, Best 104


Books: Basic Econometrics by Damodar Gujarati


Television: Beethoven Virus, He Who Can't Marry, Mind Your Language, U – Wartawan, MythBusters


Contact info


MMU ID Number: 1061106971

Email: mail2werm@gmail.com

Google Talk: mail2werm

School/University Pigeonhole: Multimedia University

Facebook Profile: http://www.facebook.com/aizuddin.sudari


Yours Sincerely,